
I guess the first subject to talk about at this point is starting a design. The great thing about designing jewelry is that you have a blank page, if you are making jewelry for yourself, there is no right or wrong design, it is an expression of yourself, and the only limitations are your skills, and that is what we are here to do, hone our skills. If you are making jewelry for others or for the market, then you have to take their likes and desires into consideration.
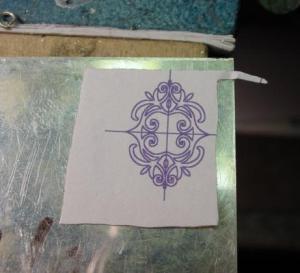
There are a number of ways to start to create jewelry, from finding an existing media and turning it into jewelry, to Computer Aided Design (CAD), wax carving, metal fabrication, Precious Metal Clays (PMC), etc. We will touch on all of these things in the future. For the first step let’s look at metal fabrication. I found a design on an antique locket that I would like as an earring. If I could draw, I would but alas, I can’t draw my way out of a paper bag. I found a way to scan the design and get it on a piece of paper. In this instance I used a CAD program, but you can use the original picture, scaled to the size you want, and then I cut and taped it to a flat sheet of sterling silver. I took a very sharp metal scribe and traced around the outside of the picture with a series of small points, just hard enough to make a mark, but not too deep.
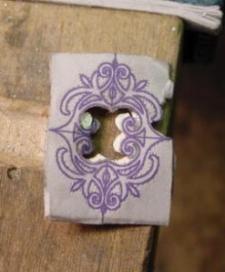
After I traced around the design completely, I removed the paper and I have an outline on the silver. (this works on wax as well) I now pierced the silver with a hole large enough to get a saw blade through. I usually use a 3/0 blade, but you can use smaller if you like, I tend to break smaller ones a lot more. after I have the piece completely cut out, I smooth the edges with small “escapement” files and sandpaper, then polish. At a later date we will get into detail on how to best file, sand, and finish pieces, but I figured we would start with an easy way to get your ideas onto metal or wax. On this piece, I also used gravers and a foredom to give the piece more of a rounded look, but that is what I wanted and that is the cool thing about jewelry making, it is an expression of one’s self as well as a craft.


Thanks for stopping by, I will keep these posts short and to the point in the future, I know we all have busy lives and I would like to give quick tips as opposed to long lessons.
Take care
Doug
Beautiful design and an awesome start to my week. Thanks for sharing, Doug!
Thanks for sharing Doug! showing the process of the making is always fascinating 🙂
Thanks for your willingness to pass on your knowledge! Blogs, YouTube, books, & articles are the way I have learned what little I know. Already picked up something new–giving the piece a rounded look using gravers–cool.
What is the material holding the piece while you are using the graver?
Thanks for asking and following along Vera, it is called Dop Wax, it is used in the stone cutting industry, but I have used it for years. You can also use pine tar or “pitch” or “Jett-Set” to hold parts. The green dop wax melts at about 160 degrees and cleans off with a soak in alcohol.
Doug, a friend just shared your blog with me, it’s great, thank you! How do you melt your dop wax, and what gauge did you use for this piece? I love the way it came out, I’d love to try my hand at this.
Thanks. I just melt the dop wax slowly and carefully with my torch. The piece was made out of 1.0mm silver.
I’ve been tinkering around with metal for a little while and finally decided to get serious this past year and take some classes. I’ll be finishing them up in the spring. My teacher is wonderful but it seems there is never an end to the knowledge and tips & tricks to make things a little better. Those like you with the knowledge, experience, and willingness to share, are invaluable. I thank you and am grateful for teachers like you. I’ll be eagerly following this blog!
Thank you so much Ilse, it is comments like yours that confirms I am on the right journey.
Doug
Comments are closed.