How to Make Pearl Post That Will “Grab”

If you make jewelry long enough, you will eventually make a piece of jewelry with a pearl or a post that will hold a glued stone to it. Here is a quick way to make sure the pearl or the stone you set will be more secure.
If you have a Rolling Mill with a grove for rolling square stock, you are ahead of the game, just roll a piece of silver down to approximately 0.7mm or so. If you don’t have a mill with those rollers with it, well here is another way to go about it.
Find a piece of sheet silver approximately 0.7mm thick and file the straightest edge flat and then scribe a line the same width as the thickness.
Now it is time to work on and perfect your sawing skills. Use your Jewelers Saw to cut along the side the line that you scribed. Take your time and cut right on the outside of the line. The straighter the cut, the less filing you will have to do. I use a Saw Blade 3/0
to cut this. Now file the edge that you just cut off and make the piece as wide as it is thick. 0.7mm in this instance.
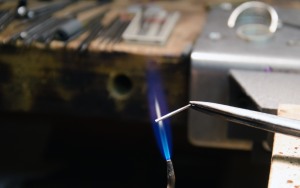
Next it is time to anneal the small piece you just made. This piece is very small, so be careful not to overheat it in the process. Use a “bushy” flame and turn off your bench lamp. Watch the color of the silver as you heat it, you want to aim for a dull pink color in the silver. Try to maintain this color for between 15 and 30 seconds, waving the flame (not too close) back and forth over the piece. I use a Smith Mini Torch for soldering and for annealing. Do not get it red hot! If you do, cool your piece and start over.
Use 2 pair of pliers or a small vise and 1 pair of pliers. I prefer to use Smooth Jawed Parallel Pliers, so the silver is not marred. These are same pliers I use to hold the silver while I cut it with my saw. Now twist the silver.

Next, just trim off enough to hold the pearl or stone and solder into place. I use a cup bur to finish off the end of the post, and drill a small divot, a little larger than the post, in the piece to be soldered to. The divot will give the post more contact area for the solder to attach the post to, and make a stronger solder joint. The twisted action of the post will bond the glue or epoxy to the stone much better.
Now, go make something beautiful and have a great day!
Doug


Maybe I missed something, but if the end result is a piece of sheet that is square in cross-section, why not just use square wire?
Thanks Kathy. If the post is just square, or smooth, with a pull or catching the stone on something, it could just slide off the post. For example, it is harder to hold onto a smooth bar of steel than it is to hold onto one with texture.
If there is something for the adhesive to grab onto and add textured “grip” it makes it more secure. Instead of the stone just breaking the bond and sliding off the smooth post, it would actually have to break the adhesive itself, as well as the bond, to come off.
Hope that makes sense.
Take care.
Doug
Comments are closed.