Designs and Inspiration can come from many, many places.

This post is from a tutorial I did a number of years ago. I was contacted by a friend who had a friend (likely story…. friend of a friend) who had a 1800’s locket handed down from their great grandmother, and they wanted the design re-created into a set of earrings. (actually 2 different sets) This process I show though, can be used for just about anything you want to trace and re-create.
I guess the first subject to talk about at this point is starting the design. The great thing about designing jewelry is that you have a blank page, if you are making jewelry for yourself, there is no right or wrong design, it is an expression of yourself, and the only limitations are your skills, and that is what we are here to do, hone our skills. If you are making jewelry for others or for the market, then you have to take their likes and desires into consideration.
There are a number of ways to start to create jewelry, from finding an existing media and turning it into jewelry, to Computer Aided Design (CAD), wax carving, metal fabrication, Precious Metal Clays (PMC), etc. We have touched on many of these things in the past blog posts.
In this example, let’s look at metal fabrication…… (my love language) I was sent this antique locket that the customer would like the design as an earring. If I could draw, I would do that, but alas, I can’t draw my way out of a paper bag. I decided to scan the design and get it on a piece of paper. In this instance I used a CAD program to trace the design, but you can use the original picture, scaled to the size you want. I then I trimmed the image and taped it to a flat sheet of sterling silver. I took a very sharp metal scribe and traced around the outside of the picture with a series of small puncture points through the paper, just hard enough to make a mark, but not too deep.
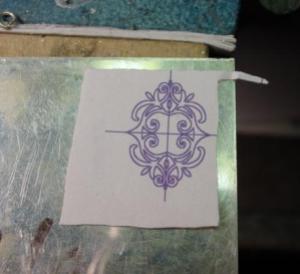

After I traced around the design completely, I removed the paper and I have an outline on the silver. (this works on wax as well) I now pierced the silver in the center of the design with a drill bit or a ball bur, large enough to get a saw blade through. I usually use a 3/0 Saw Blade, but you can use smaller if you like, I tend to break smaller ones a lot more. after I have the piece completely cut out, I smooth the edges and saw blade marks with small “escapement” needle files and sandpaper, then polish. On other posts I get into detail on how to best file, sand, and finish pieces, but I figured we would show an easy way to get your ideas onto metal or wax. On this piece, I heated up the piece and mounted it in Green Dop Wax
to secure it while I cut it with gravers and a Foredom
to give the piece more of a rounded look, but that is what the customer wanted and that is the cool thing about jewelry making, it is an expression of one’s self as well as a craft.


I molded the final silver piece, cast it in gold, polished it and set stones.

Thanks for stopping by, I could get long and lost in all the details, but I also try to balance info with content and try to keep these posts short and to the point, I know we all have busy lives and I would like to give quick tips as opposed to long lessons.
Take care, and Go Make Something Dazzling!
Doug